Getting started with Workived
A short, step-by-step guide for HR admins. Set up your company, add your team, and run attendance, leave and claims.
Screenshots show a demo workspace with sample data.
Find your way around
Learn the layout and the order that works best.
Every page opens from the bar at the bottom of the screen: Overview, Attendance, Tasks, Leave, Claims, Calendar and People. More holds the rest. Red badges on Leave, Claims and More show how many requests are waiting for you.
Pictures in this guide have numbered markers. Each number matches the list under the picture.
The setup order that works best: set up the company, add your team, set work schedules, then let people start using attendance, leave and claims.
Set up your company
Name your workspace and know where settings live.
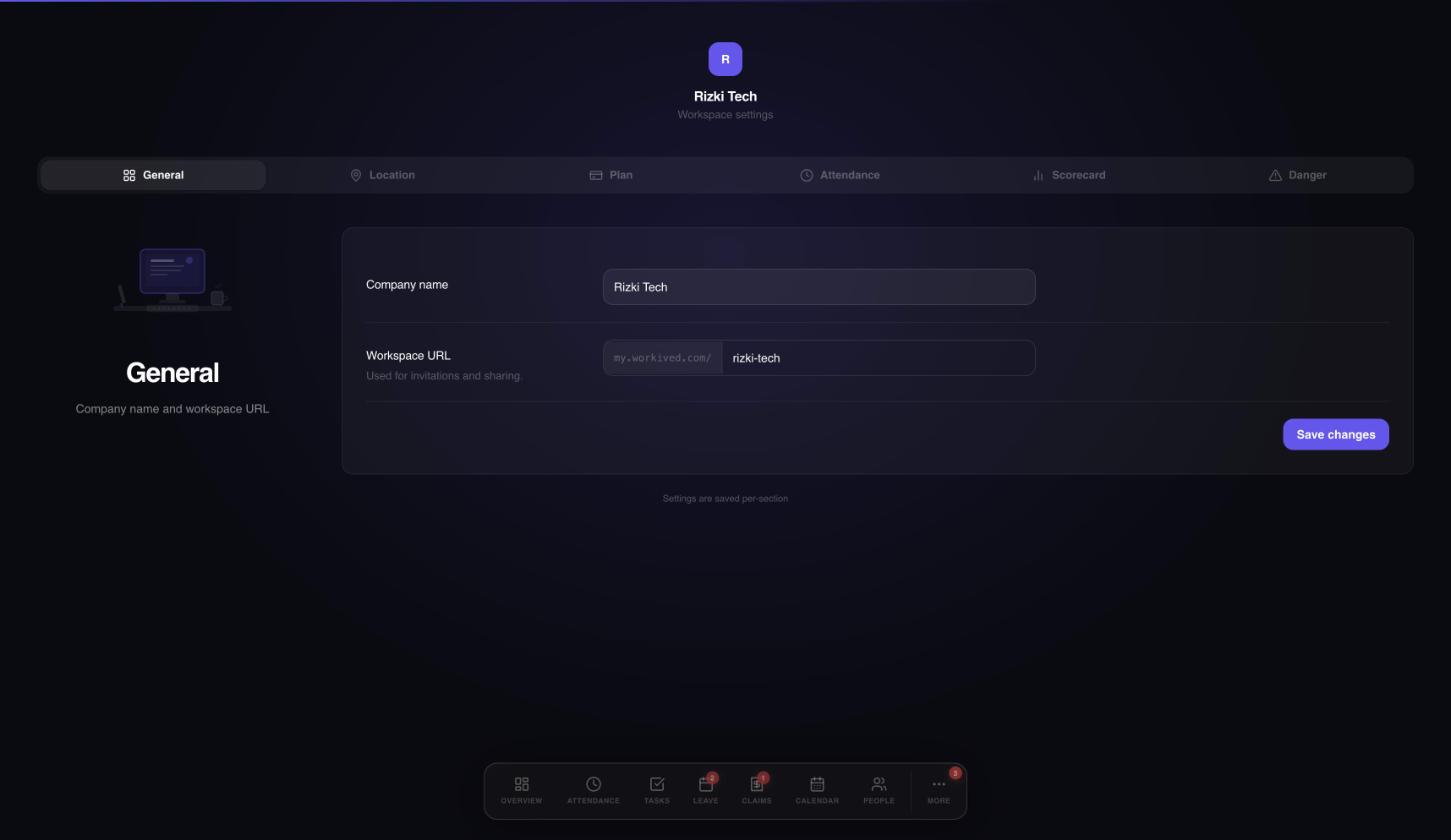
Open the Settings page for your workspace. The General tab holds your company name and workspace address. Other tabs cover location, plan, attendance, scorecard and danger-zone actions. Each section saves on its own.
 123
123- Settings tabs: General, Location, Plan, Attendance, Scorecard and Danger.
- Your company name, shown across Workived.
- Save changes. Settings are saved per section.
Add your team
Add employees, invite them and control access.
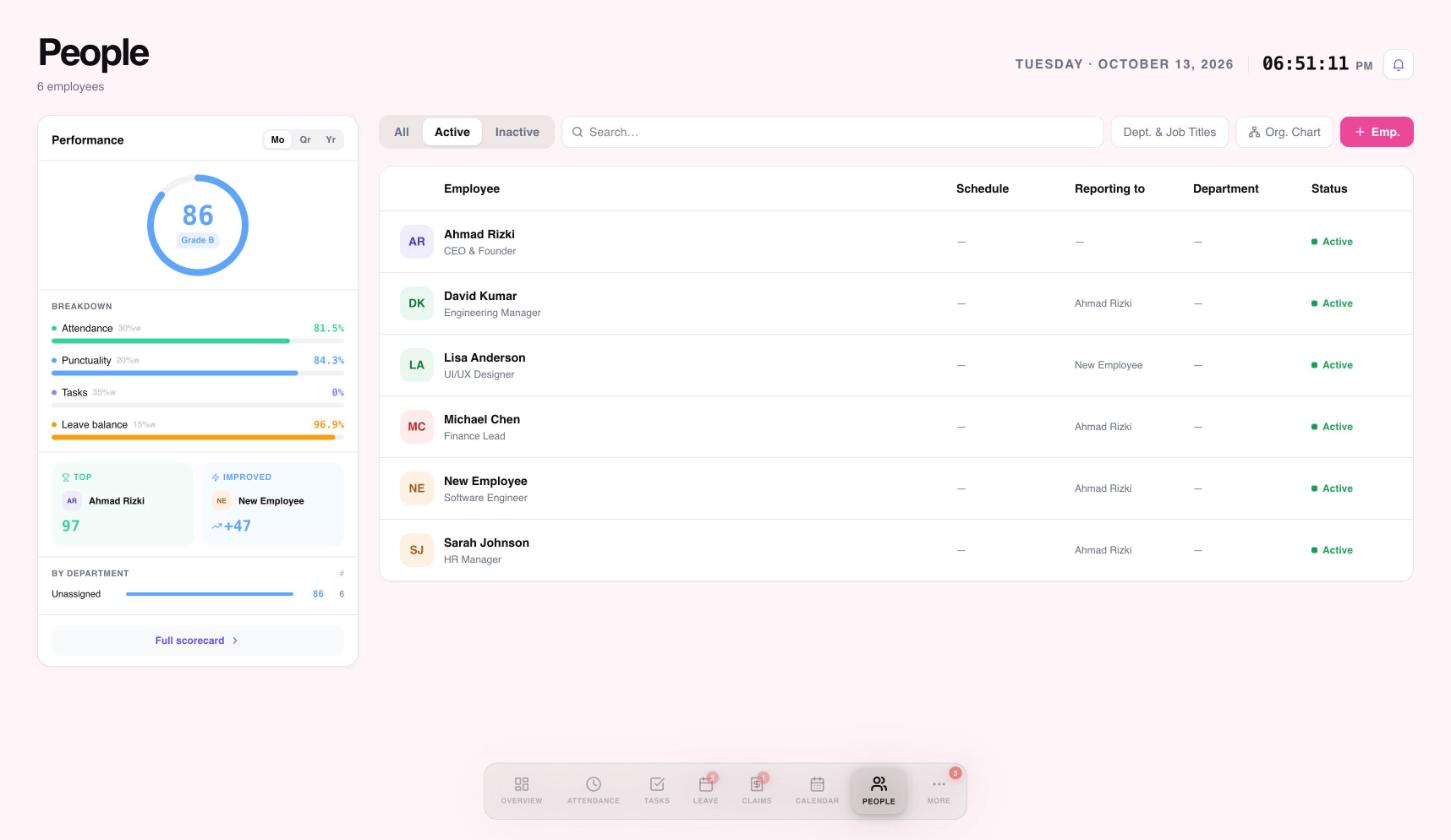
Open People to see everyone in your company, with their schedule, manager, department and status.
 123
123- Filter by All, Active or Inactive.
- Search by name.
- Add an employee.
Add an employee
- Select + Emp. at the top right.
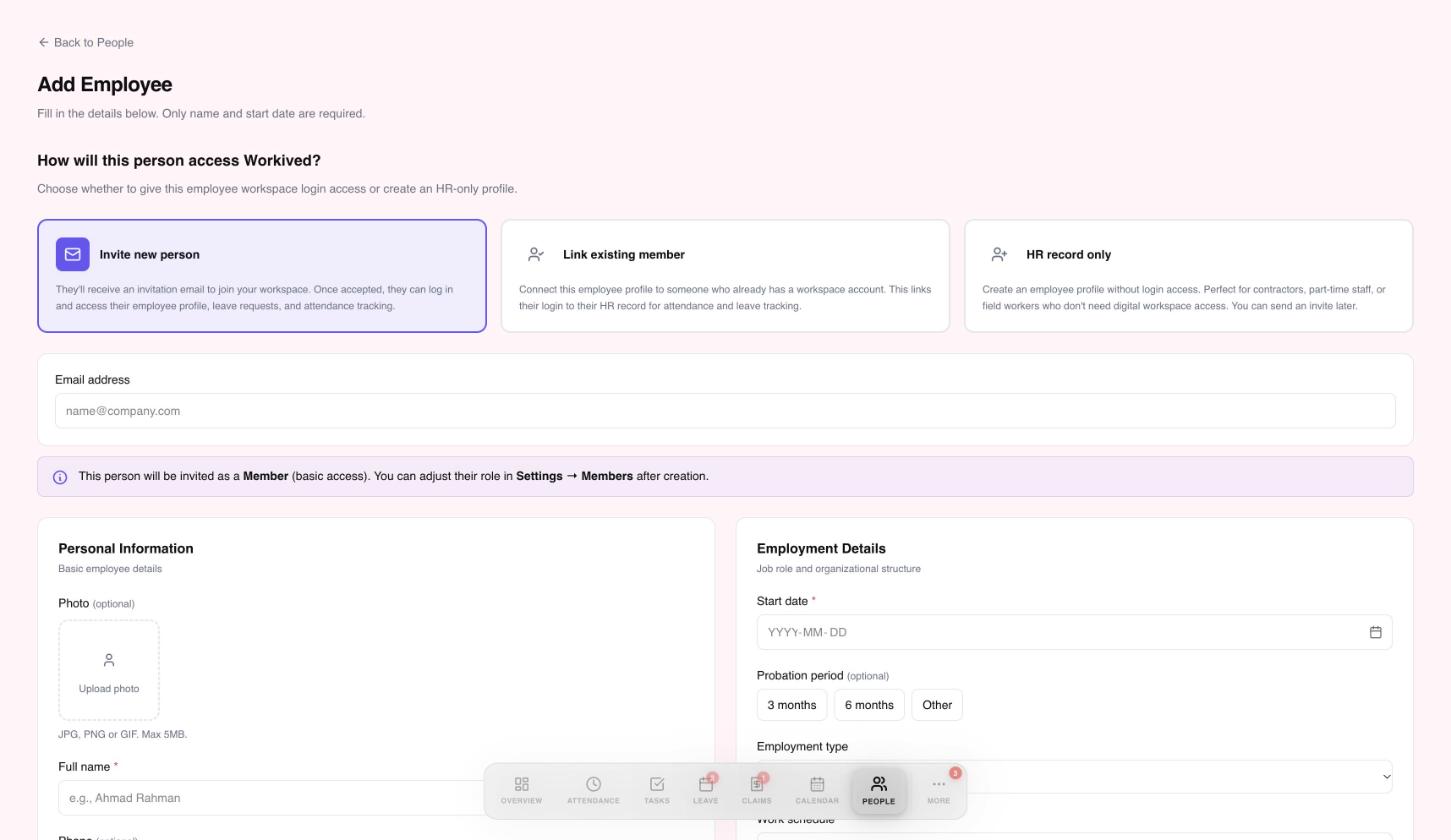
- Choose how this person will access Workived: Invite new person (they get an email invitation), Link existing member (connect a profile to someone who already has a workspace account), or HR record only (a profile without a login, handy for contractors or field staff; you can send an invite later).
- Enter the full name and start date. These are the only required fields.
- Add optional details such as photo, phone, probation period, employment type and work schedule.
- Save the employee.
 1234
1234- Choose how this person gets access.
- Email address, needed only when you invite someone.
- Start date is required, along with the full name.
- New invitees join as a Member. Change roles in Settings, then Members.
The free plan includes up to 10 employees.
Check who has access
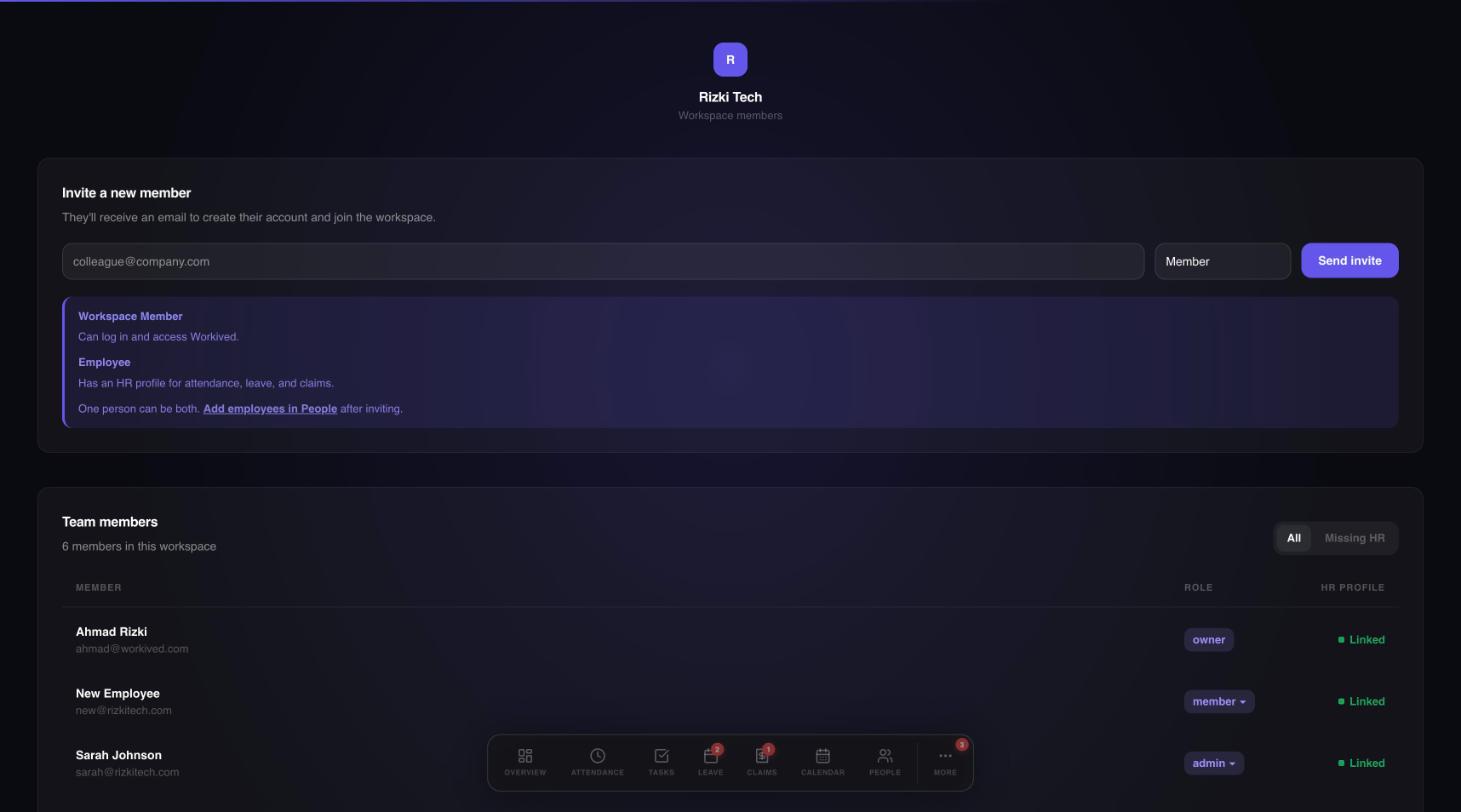
The members page lists everyone who can log in, their role, and whether they are linked to an employee profile.
 123
123- Invite by email and pick a role.
- Each person's role.
- Missing HR shows logins that have no employee profile.
Edit details and end employment
Keep records current and handle people who leave.
Edit an employee
- On the People page, select the employee's name.
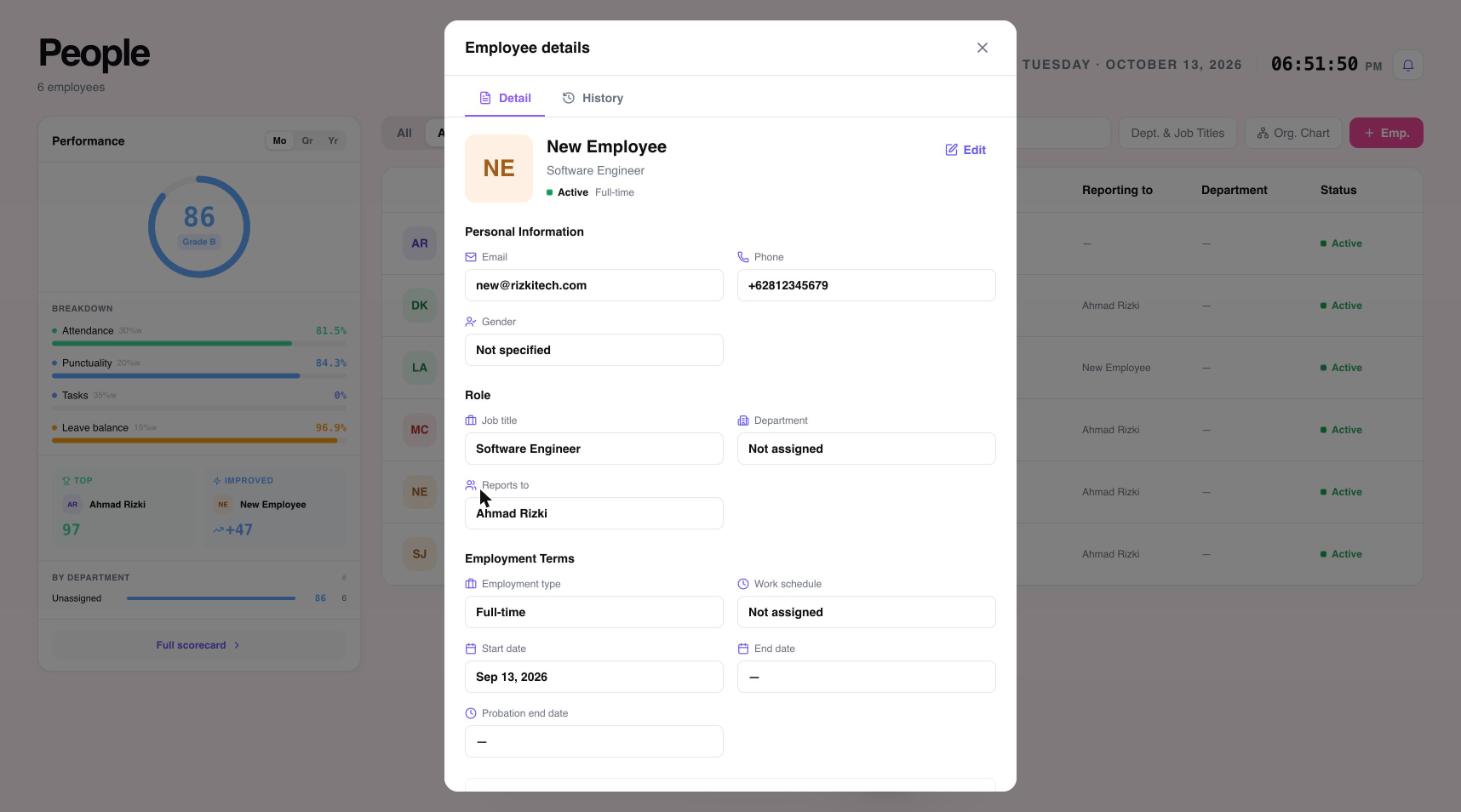
- Review their details, then select Edit to change them.
- Save your changes. The History tab keeps a record of what changed.
 123
123- Edit this employee.
- History of past changes.
- Employment terms: type, work schedule, dates and probation.
End employment
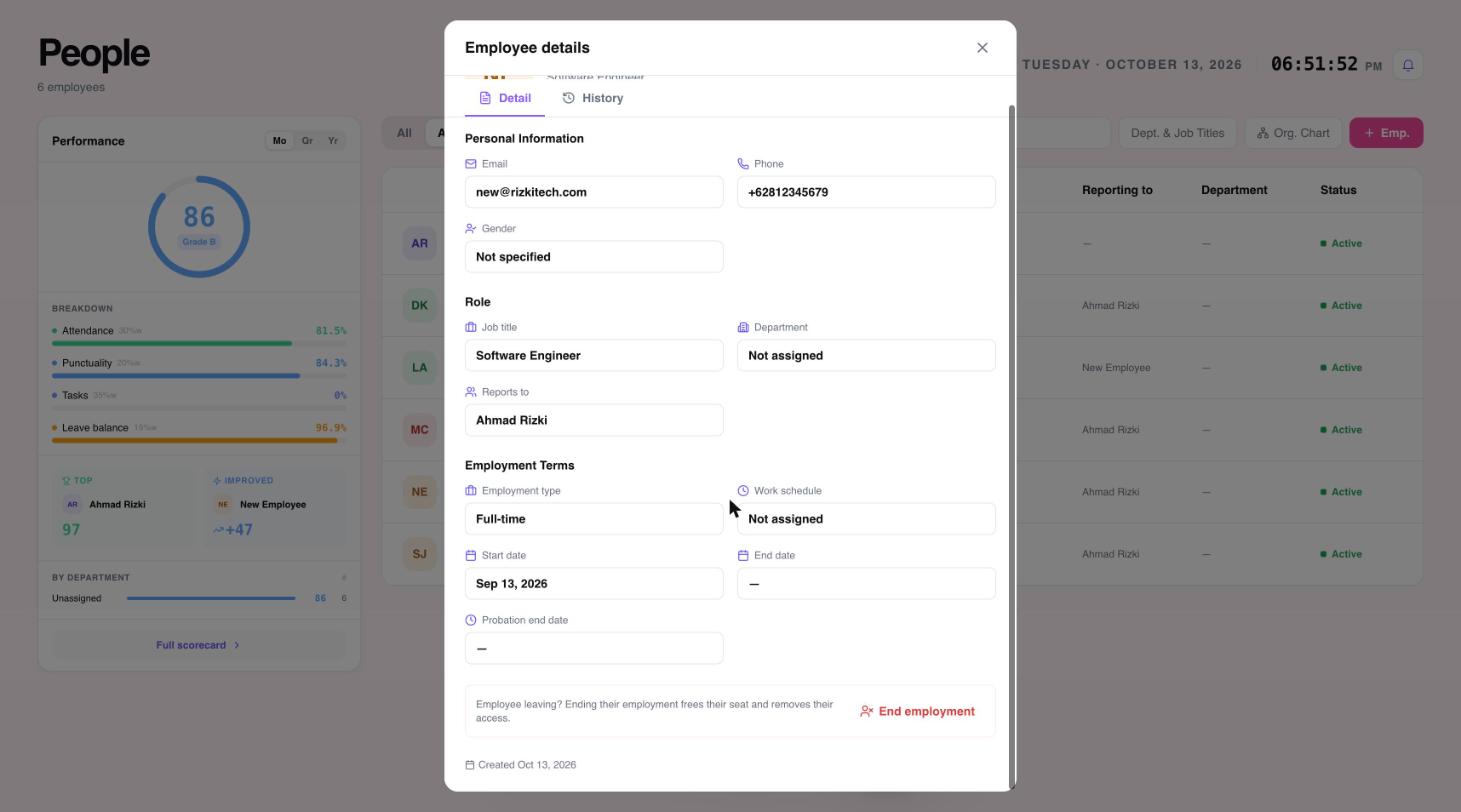
When someone leaves, open their details and scroll to the bottom of the panel. Select End employment. This frees their seat and removes their access to Workived.
 1
1- End employment frees the seat and removes their access.
Workived does not delete HR records, so the employee's history is kept.
See who reports to whom
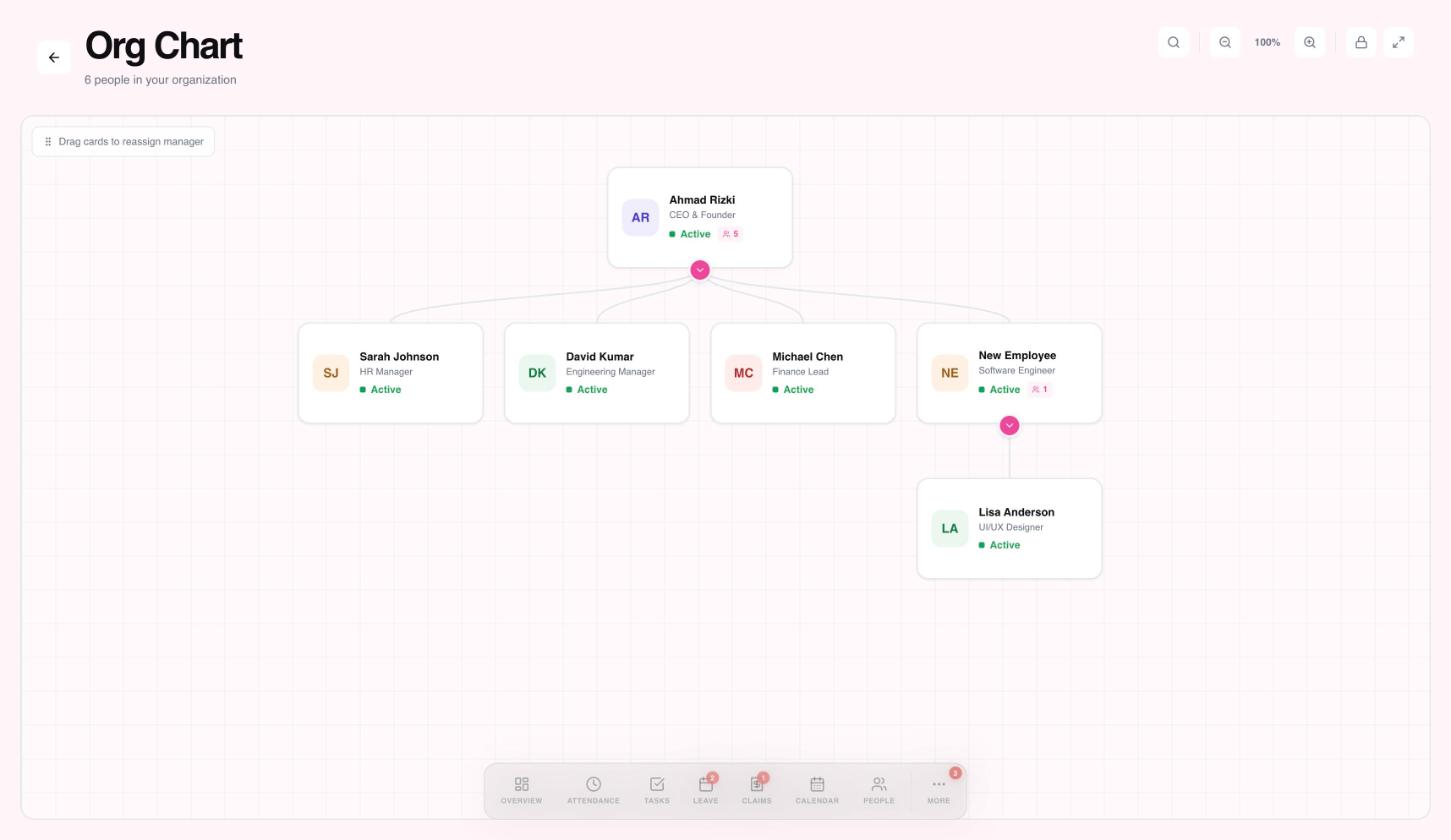
Select Org Chart on the People page to see reporting lines. You can drag a person's card onto a new manager to change who they report to.
 123
123- Drag a card onto another person to change who they report to.
- Search, zoom and full screen.
- Expand or collapse a person's team.
Set work schedules
Define working days and hours.
A work schedule says which days and hours an employee works. Attendance uses it to decide who is on time.
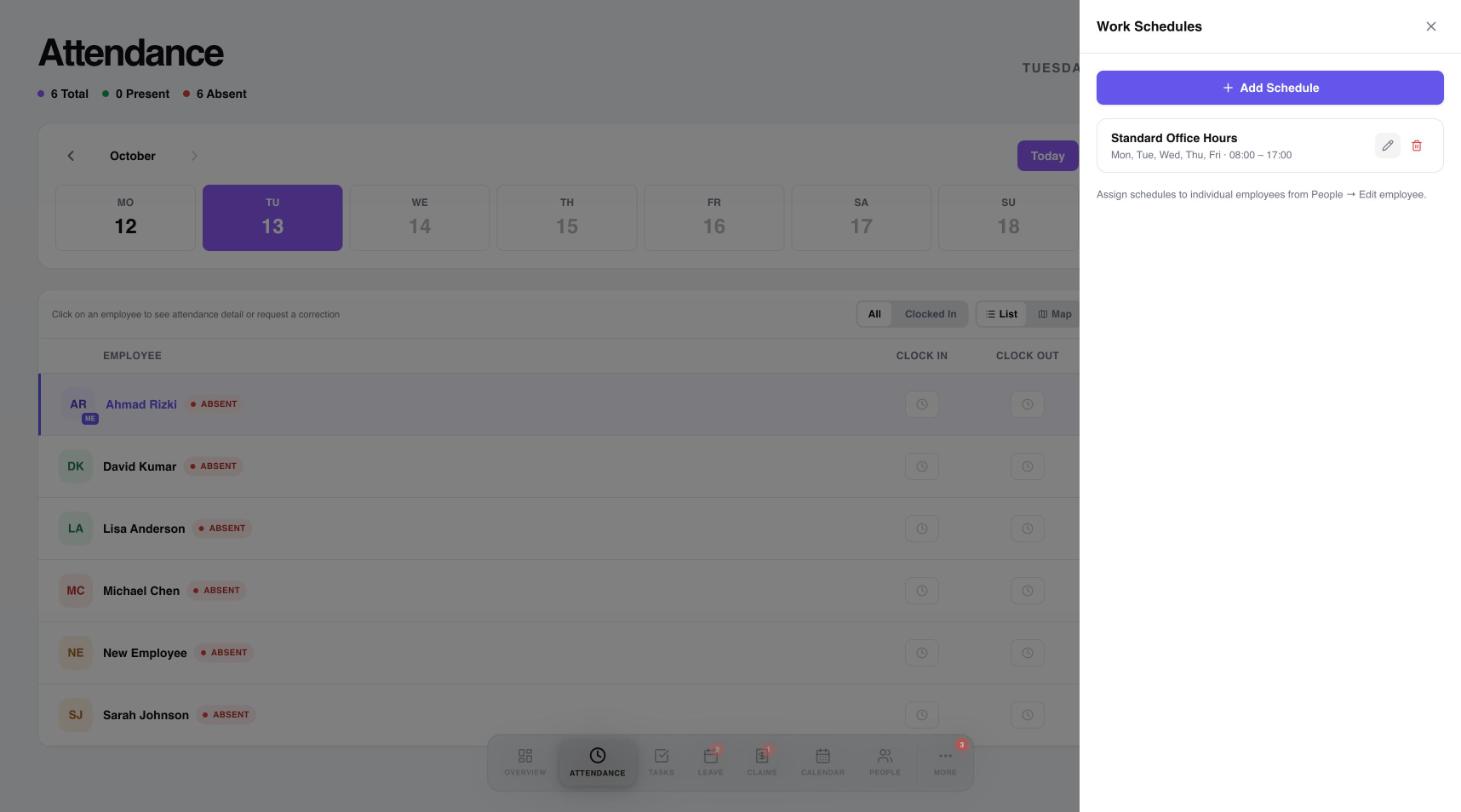
- Open Attendance and select Manage on the Work Schedules card.
- Select Add Schedule to create one, or the pencil to change an existing one.
- To give a schedule to someone, open People, edit the employee and choose it under Work schedule.
 123
123- Add a new schedule.
- Edit a schedule.
- Delete a schedule.
Attendance
See who is in, and fix mistakes.
Open Attendance to see who is in today.
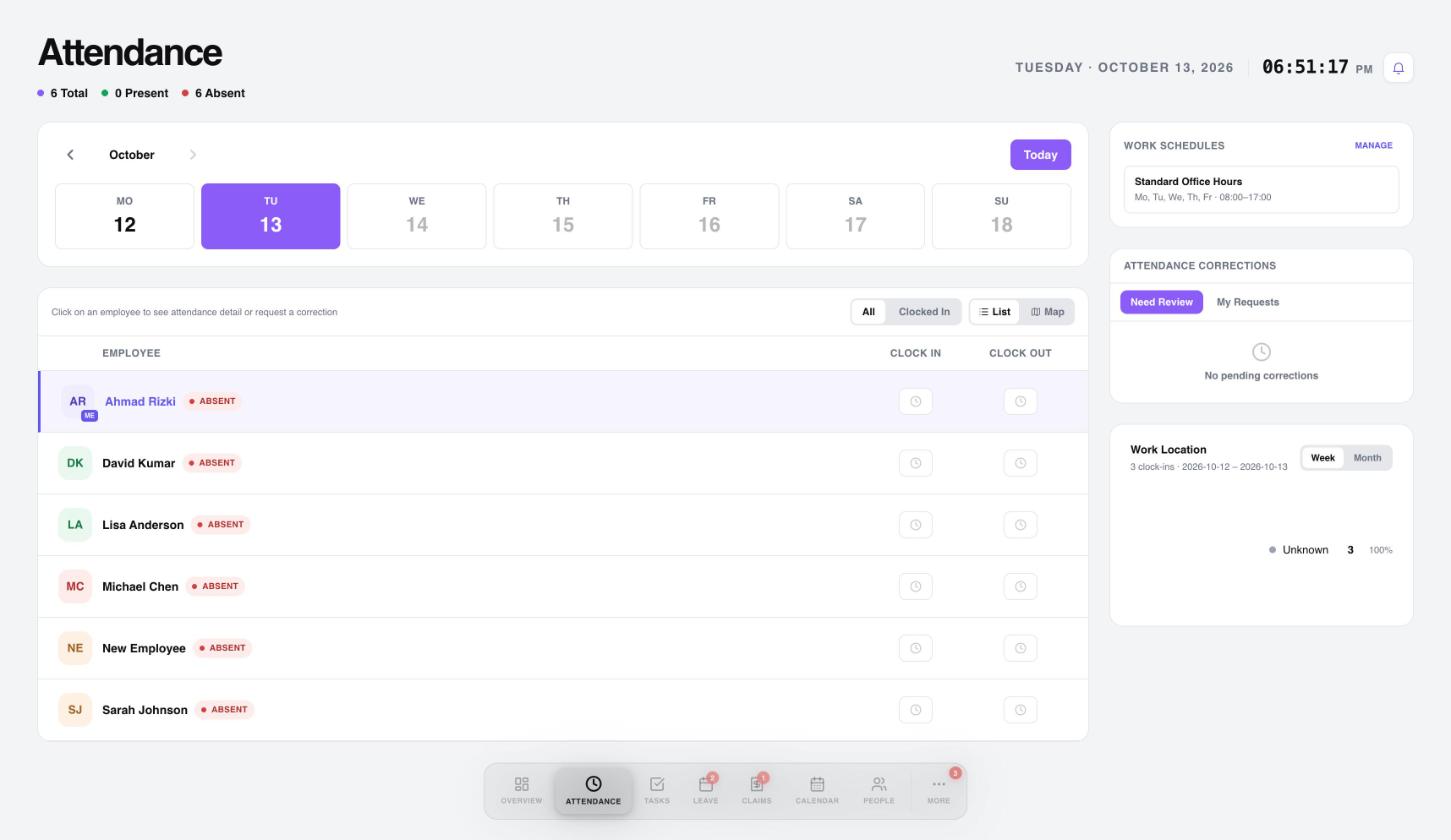 12345
12345- Pick the day to look at.
- Show everyone or only people who are clocked in.
- Switch between list and map.
- Work schedules.
- Attendance corrections waiting for review.
- Clocking in and out: employees clock in on the Workived mobile app. The web overview shows the clock but asks them to use the mobile app.
- Details: select a name to see that day's schedule, clock in, clock out and note.
- Corrections: if a clock time is wrong, request a correction from the expanded row. Pending requests appear under Need Review, and each person's own requests under My Requests.
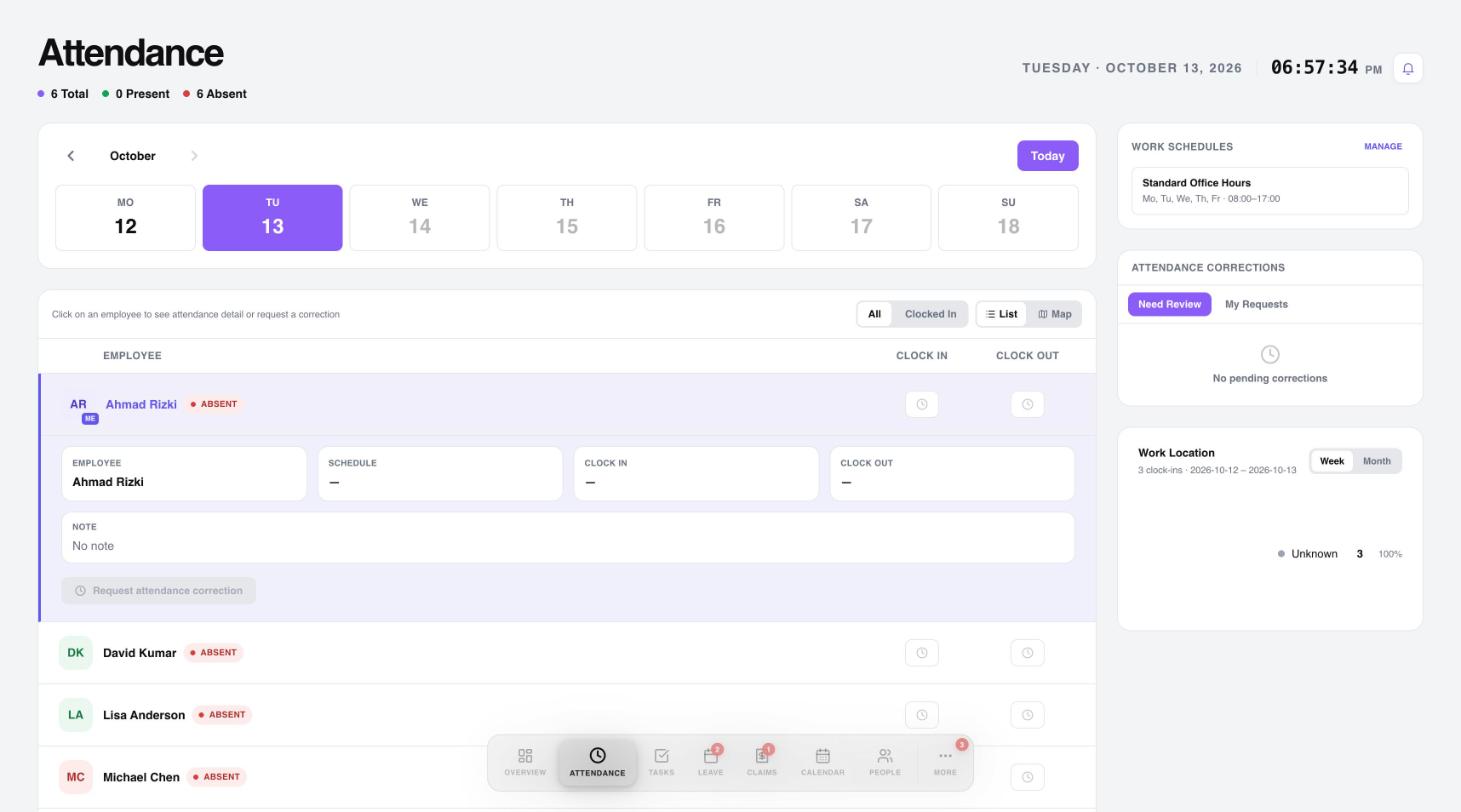 12
12- Select a name to see that day's schedule, times and note.
- Request a correction. It is greyed out when there is no clock-in for that day.
Leave
Request time off and decide on requests.
Open Leave to see your balances for each leave type.
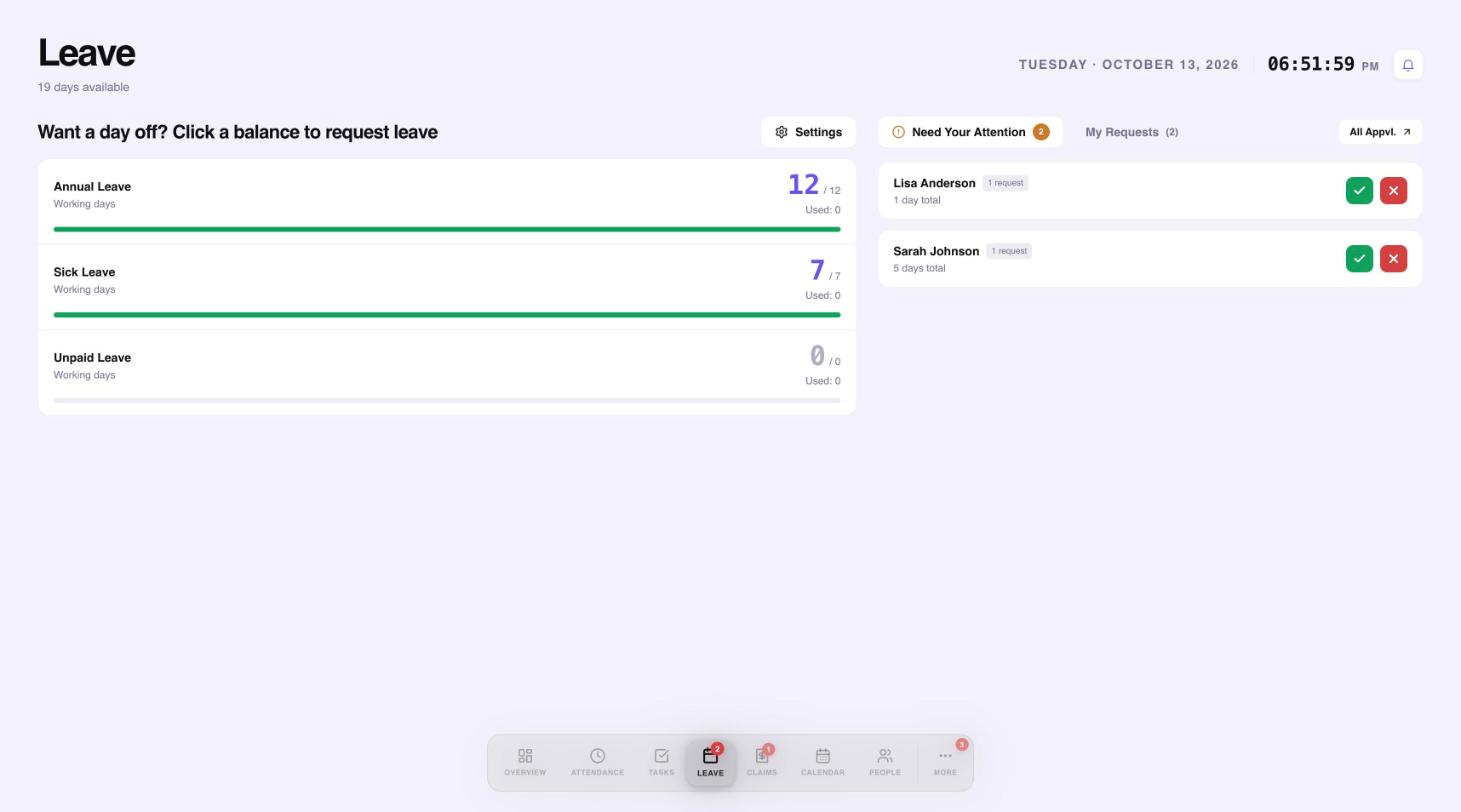 12345
12345- Your balances. Select one to request leave.
- Leave types and policies.
- Requests that need your decision.
- Approve or reject.
- Your own requests.
Request leave
- Select the balance you want to use, for example Annual Leave.
- Pick your start and end dates on the calendar.
- Add a reason if you want to, then select Submit Request.
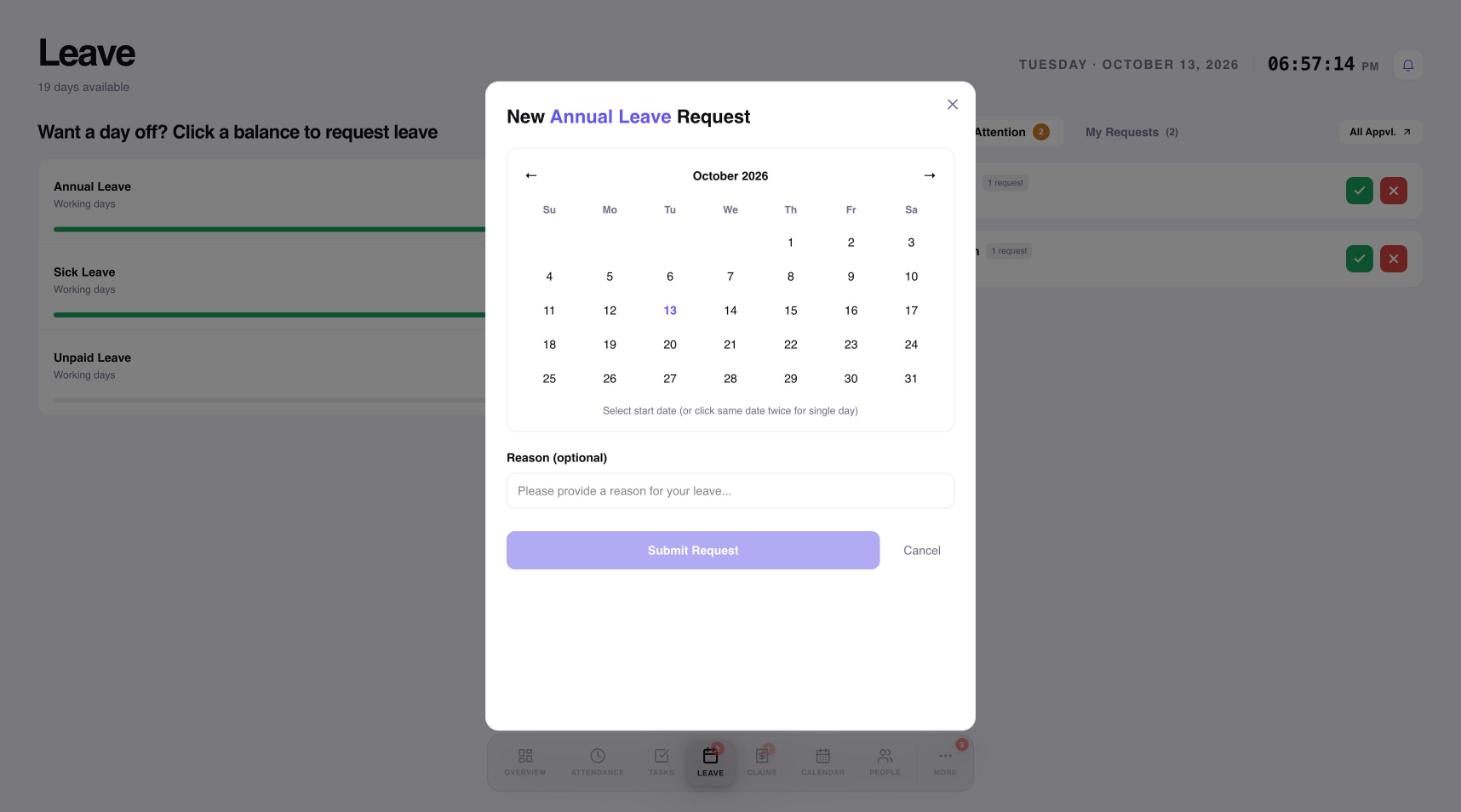 123
123- Click a start date, then an end date. Click the same date twice for one day.
- A reason is optional.
- Submit the request.
Approve or reject
Requests that need your decision appear under Need Your Attention. Select the green tick to approve or the red cross to reject.
Next: ClaimsClaims
Submit expenses, approve them and mark them paid.
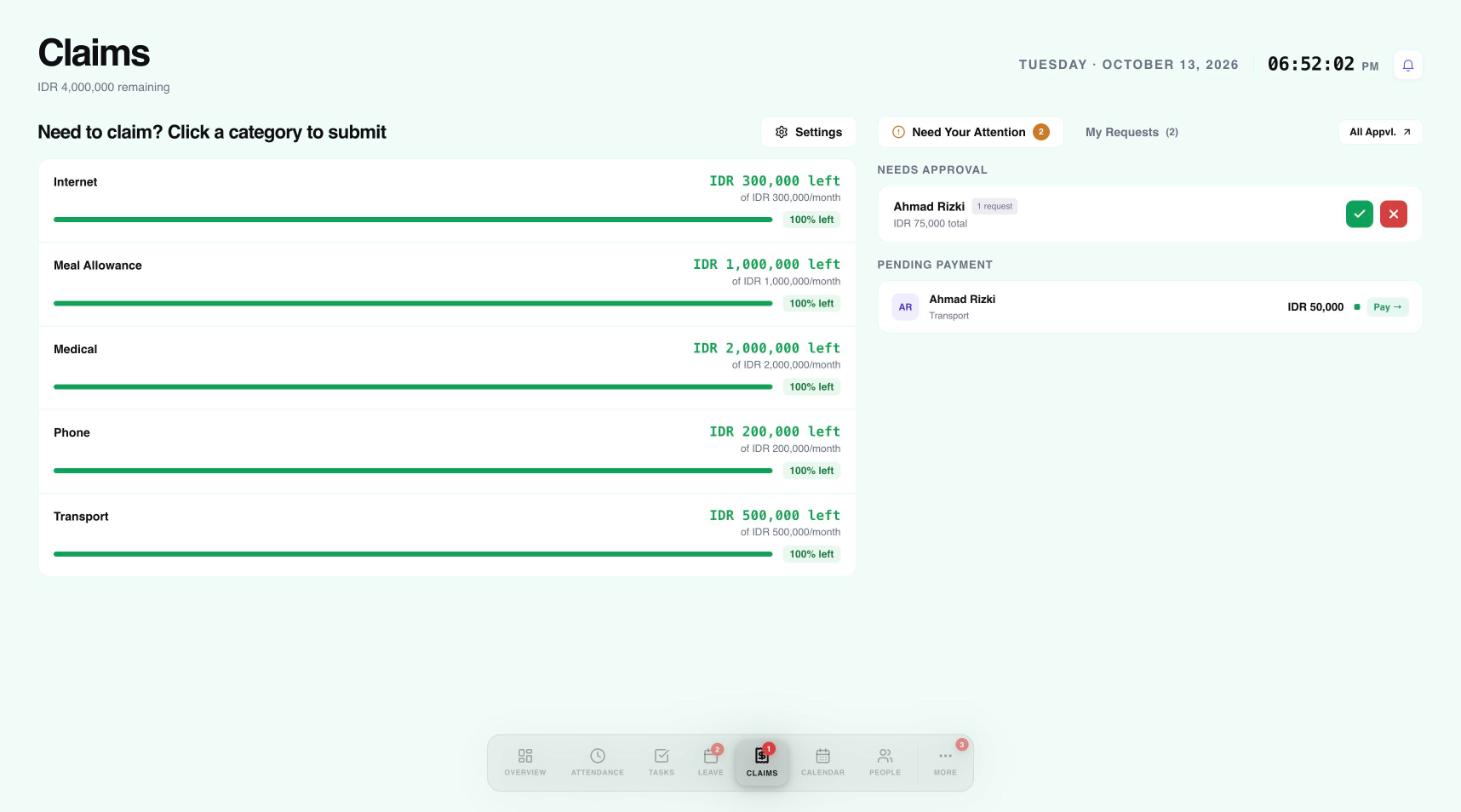
Open Claims to see each category with its monthly limit and how much is left.
 123
123- Categories with the monthly limit left. Select one to submit a claim.
- Claims waiting for approval.
- Approved claims waiting to be paid.
Submit a claim
- Select a category, for example Transport.
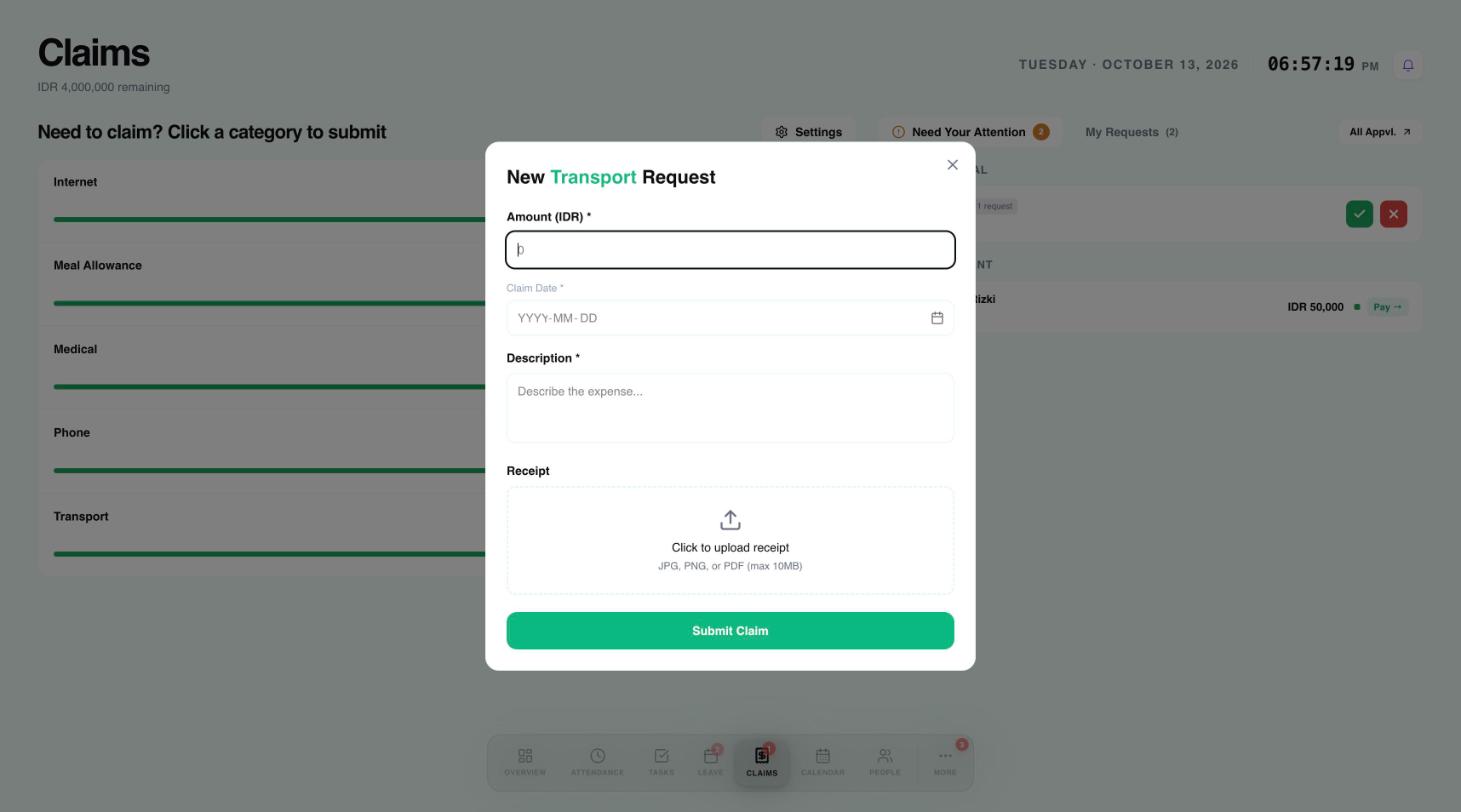
- Enter the amount, the date and a description.
- Attach a receipt if you have one.
- Select Submit Claim.
 12345
12345- Amount in your company currency.
- Date of the expense.
- Describe what the expense was for.
- Attach a receipt: JPG, PNG or PDF, up to 10 MB.
- Submit the claim.
Approve and pay
- Under Needs Approval, approve or reject each claim.
- Approved claims move to Pending Payment. Once you have paid the person, select Pay to mark it as paid.
Approvals in one place
Every pending request in one list.
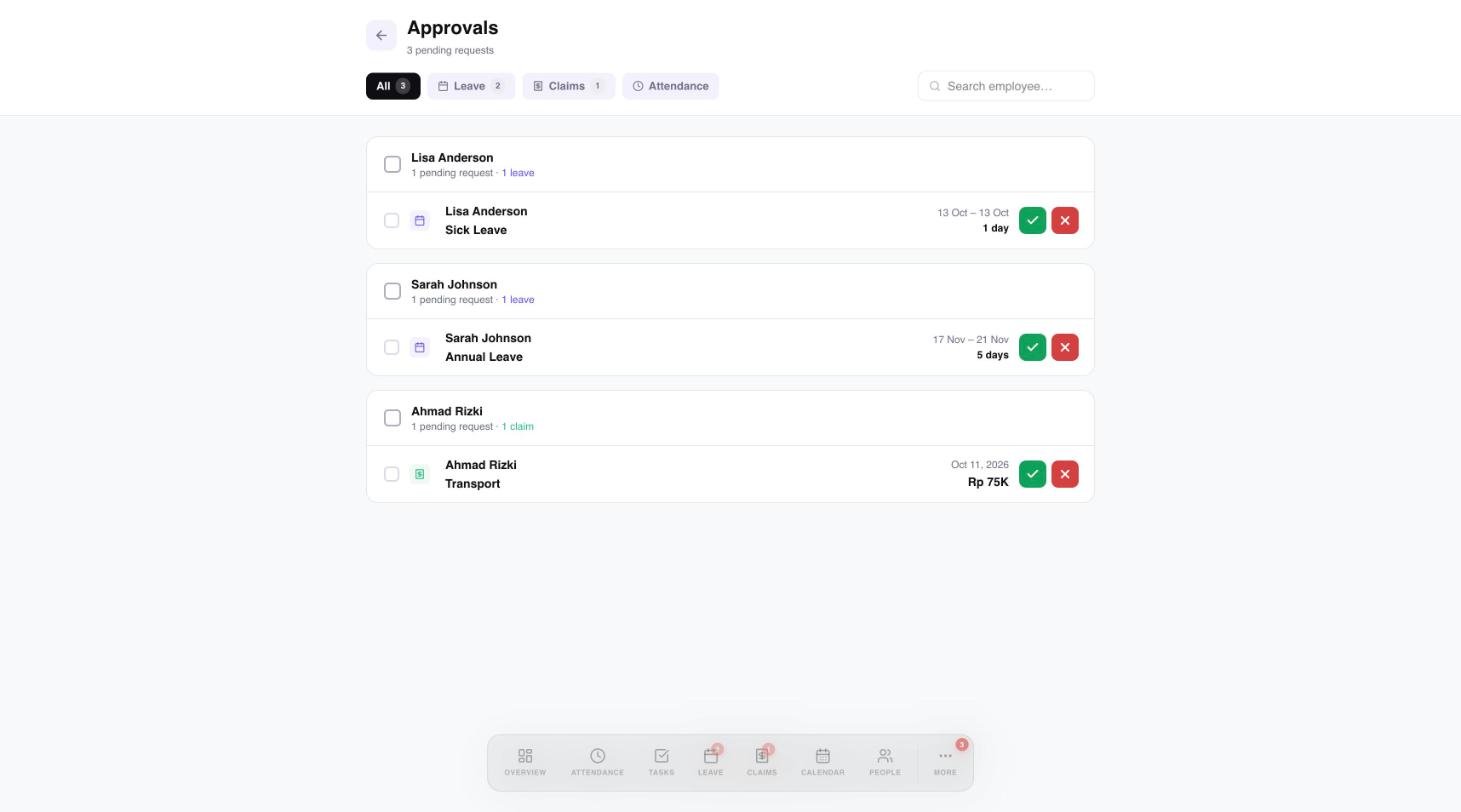
The Approvals page gathers every pending request: leave, claims and attendance corrections.
 1234
1234- Filter by request type.
- Search by employee.
- Tick boxes to select several requests.
- Approve or reject.
Calendar
See who is away and when.
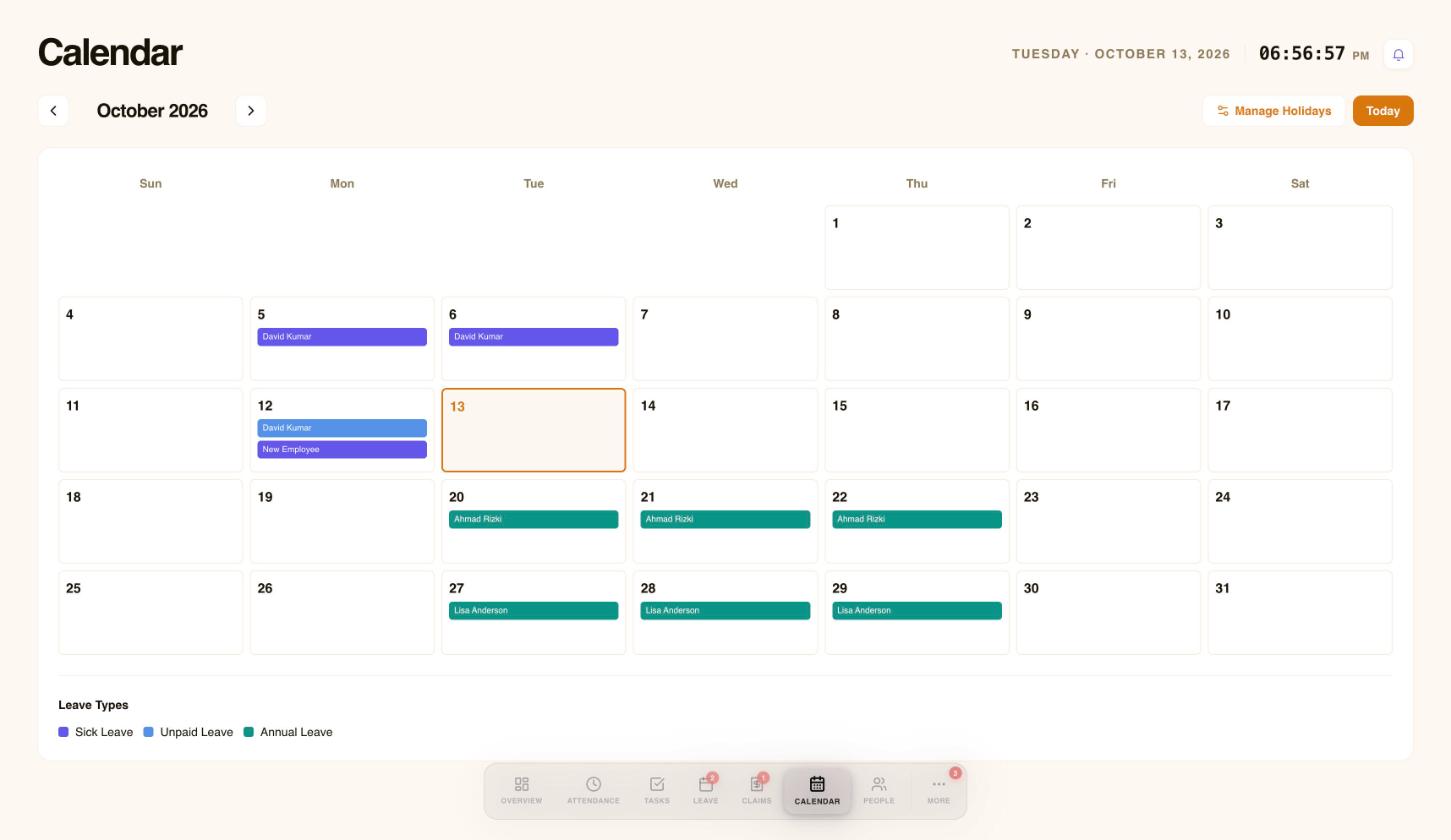
Open Calendar to see who is away and when. Approved leave appears as coloured bars, and the colour key at the bottom tells you the leave type. Select Manage Holidays to review public holidays.
 1234
1234- Move between months.
- Manage public holidays.
- Approved leave shows as a coloured bar.
- Colour key for leave types.
Common questions
Quick answers to common questions.
Can I add someone who does not need to log in?
Yes. Choose HR record only when adding them. You can send an invite later.
Where do employees clock in?
On the Workived mobile app.
Someone left the company. What do I do?
Open their details on the People page and select End employment.
Someone has a login but no employee profile.
Open Settings, then Members, and use the Missing HR filter to find them, then add their profile in People.
Need a hand?
Email my@workived.com and we will help you out.